MTS #14 – Physical Inventory
SMARTSystem Management Training
Training Session #14 – Physical Inventory
Purpose: To capture physical inventory counts using laptops at multiple locations.
Keywords: The following is a list of key terms used in the SMARTSystem that you should be familiar with and understand.
- SKU is an abbreviation for stock keeping unit that identifies a specific stock item in inventory. In the SMARTSystem, SKU can be your Product Code, the UPC or GTIN numbers.
Pre-requisites:
- Laptop or tablet
- Wired or wireless connection to the Server
- Bar Code Scanner connected to the laptop/tablet
Overview:
The Physical Inventory process consists of 4steps:
- Scanning the bar code of inventory items is the first step. The bar code can be your product code, UPC or GTIN codes,
- Stage inventory scans from one or more devices so that like products from different locations can be consolidated,
- Close all Physical Inventory scanning programs to prevent changes during the posting process, and
- Post inventory quantities.
The Physical Inventory program is selected from the Inventory Menu:
INVENTORY > Physical Inventory
which displays the following screen:
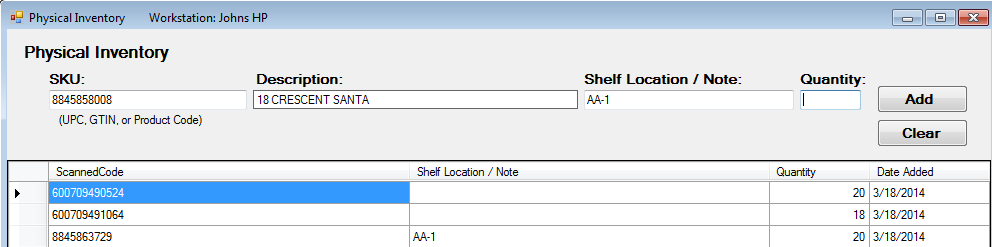
Scanning:
Using the bar code scanner, scan the bar code and the information from the bar code will be displayed in the SKU field in the top portion of the screen above. If the code is found in the Inventory Table the product description will be displayed in the Description field and the cursor is positioned in the Quantity field.
Back tab to enter a repetitive Shelf Location / Note, then tab to the Quantity field and enter the item count.
This is repeated until all items are scanned and accounted for thereby completing your area.
Stage:
When scanning is completed, the items scanned are listed as illustrated on the screen below:

The next thing, after everyone has completed their scanning, is to select the Inventory Reconciliation program:
INVENTORY > Inventory Reconciliation
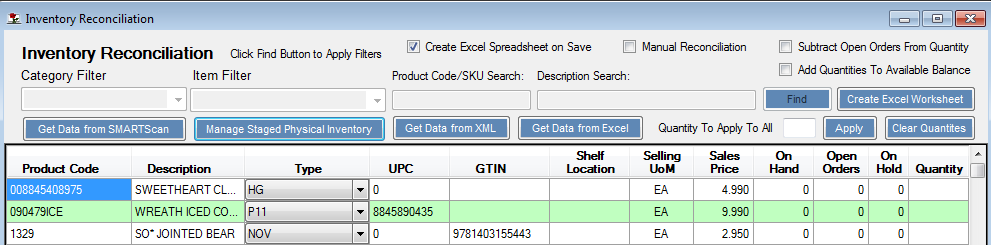
Click the blue button under Item Filter, Manage Staged Physical Inventory. The following Manage Staged SMARTScan Data will be display with all of the items scanned including the Workstation, Date and Time Scanned, Scanned Code (SKU) Shelf Location and Quantity.

At this point you can click the Exit button and close the scanned information without losing it. You can also make changes to the line items, including Quantities or deleting lines as shown below.
If you want to delete one or more lines, highlight the lines (holding the Shift key you can highlight multiple lines) and press the Delete Key on the keyboard. This will remove the highlighted lines from the scanned items.
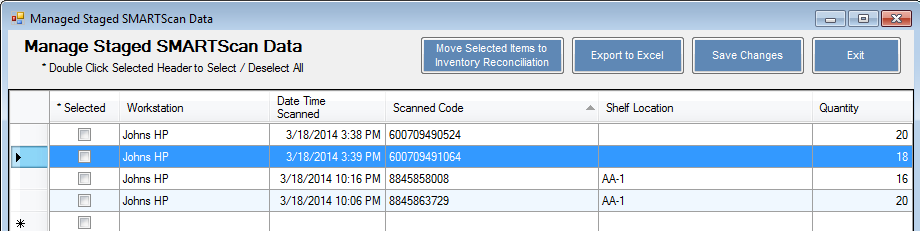
The second button can be used to export the items listed to Excel.

Normally, you select the items you want to Post. You can select them individually or all of them by double clicking the *Selected heading. Once the items are checked that you want to Post to update inventory, click the first blue button Move Selected Items to Inventory Reconciliation.
You are now ready to Post your scanned inventory quantities.
Close:
Before posting, make sure all scanning is completed and the Physical Inventory program is closed. Closing the Physical Inventory scanning programs will prevent changes during the posting process.
Post:
The scanned records will populate the Quantity column on the Inventory Reconciliation screen and click SAVE to process.
Keep the checkbox marked that will Create Excel Spreadsheet on Save to provide an audit trail for each Post.
Questions and Answers
If you have any questions or need support, please contact us at Support@Floralcomputer.com or call 727-483-5306 for assistance.